|
||||||||||||
|
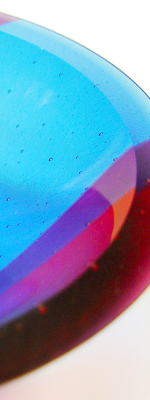
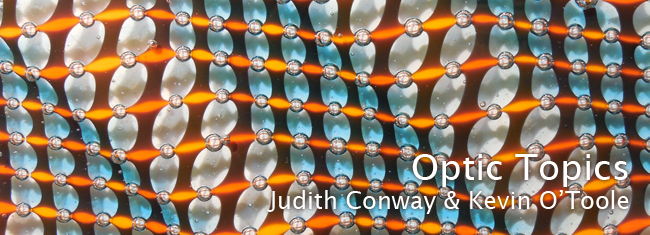
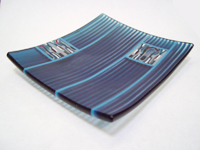
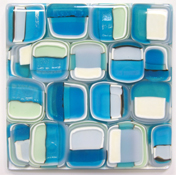
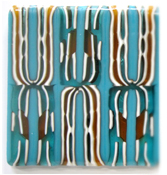
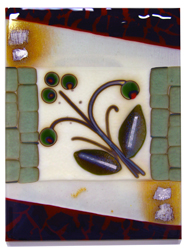
We have done many experiments here at Vitrum to learn how to control the distortion and displacement of the elements of design in kilnformed glass. These experiments have resulted in the techniques that we will share and demonstrate in this unique class. We’ve long been intrigued with the natural ability of glass to flow in the heat of the kiln, and how it displaces and distorts the surrounding or underneath glass, patterns and shapes. You’ll start by creating bold geometric patterns created from stringers and sheet glass, then we’ll use construction techniques and the heat of the kiln to deliberately contort these rigid patterns into flowing designs with striking optical form and depth. Controlled bubble entrapment as design elements and visual distortions will also be demonstrated and explored. You’ll create and take home a wide variety of samples that will launch your work in new directions. |
||||||||||||
|
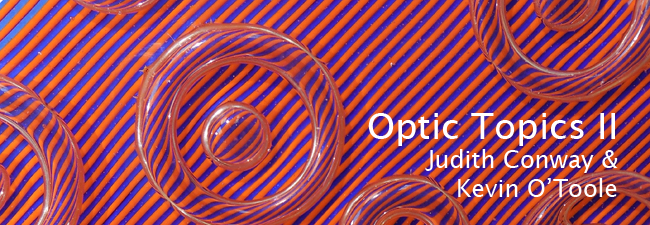
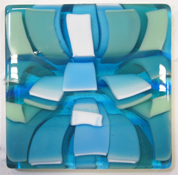
This class, designed for the student who has already taken our Optic Topics course, continues the study of learning how to control the distortion and displacement of design in kilnformed glass as it passes through the firing sequences. Building on techniques and concepts from the first course, you’ll create bold geometric patterns in stringers and sheet glass that use a variety of new techniques to shape the glass that is placed on top of these patterns before they are fired together. During the firing, the heat of the kiln will visually contort these rigid patterns by forcing changes in the top glass as it seals to the bottom pattern. Advanced controlled bubble entrapment as design elements will also be introduced and explored in the workshop. Once again, you’ll create and take home a wide variety of samples of these techniques that will launch your work in new directions. Prerequisite: Optic Topics. |
||||||||||||
 |
||||||||||||
|
This two-day class will be held on two consecutive Saturdays or Sundays to allow for the more involved firing that is required.
This class is an updated version from the first version we taught – we have added the option for an Optic Drop as one of your choices! You will have the opportunity to design and fabricate two drop forms during class, one large and one small. The information imparted is the same as we shared in the first version – but you now have the option for a gorgeous optic bubble style as one of your options for either of the two projects! We will discuss various mold options and will have a wide variety of finished bowls and vases to inspire you. We will also have several drop-formed vessels in various stages of the slumping process so that you can observe the actual movement of the glass during the firing. During the second day of class, you will coldwork and finish the slumped forms created on the first day. |
||||||||||||

|
||||||||||||
|
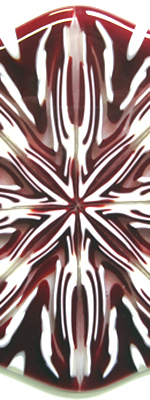
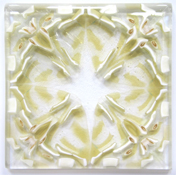
WOW! The first samples that came out of the kilns as this class was being developed caused a standing ovation from our staff artists. Yep, they are that amazing.(and our artists are, too!) A thick, free-standing optically-distorting block project that requires almost no hand-polishing? Yes. And we’ll show you two ways to do it. You’ve all admired the thick little block on display during our Optic Topics class, and you’ve certainly made no secret of wanting to take a class to learn how to make it. Well, this is the class for you. In this three-day workshop, the third in the uniquely Vitrum series of Optic Topics, students will further experiment with the optic distortions caused by intentionally disturbing a regular pattern of lines. We will combine several layers of distorted patterns in a thick block that further physically and visually distorts what the viewer perceives. We’ll design several projects that will take advantage of optical distortions and that are further enhanced by being inserted within a thick block. You’ll learn how to correctly dam and fire the thick composition, and will also learn two different methods for creating a block that requires little coldworking to be gallery-ready. |
||||||||||||
|
||||||||||||
|
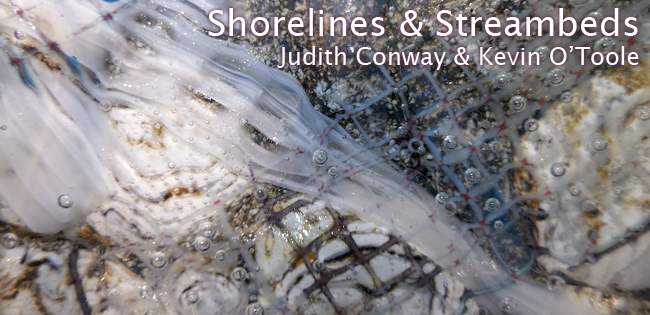
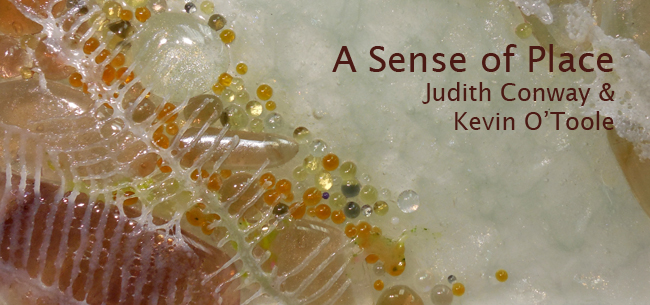
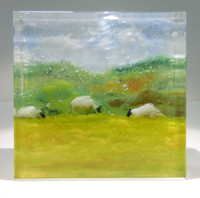
A Sense a Place has been a Vitrum classic workshop since Judith and Kevin taught it at The Studio of the Corning Museum of Glass over a decade ago. Many of the class projects have changed over the years, but one that has always been included in the class is “Summer Snapshot”, a perennial class favorite. Responding to multiple requests, we’ve developed this class to focus solely on the many interesting techniques associated with this one project and further explore them. In this three-day workshop, students will use a variety of methods to create kilnformed components that will be combined in the composition of their two final pieces – the Shoreline and the Streambed. Working with iridized glass, you will create custom iridized frit and colorful cabochon blanks to use as “raw material” for a variety of components for the two projects. We will also work with frits and powders to create representations of natural elements found in these water environments. Design components will be kiln-fired, and then manipulated using both hot and cold techniques, re-fired and finally selectively combined in the projects. This class is designed for the student with a knowledge of kiln glass fusing who is interested in exploring new techniques in the medium. |
||||||||||||
|
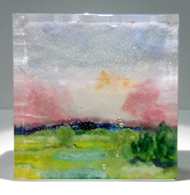
In this three-day workshop, students will explore a variety of thoughtful techniques to create kilnformed components that will be used to convey the essence of the environment around them. Students will be exposed to a body of techniques designed to soften and ease the edge, blur the line, and convey a sense of natural beauty while respecting the natural properties of glass -- transparency and translucency.
Design components will be kiln-fired, then manipulated using both hot and cold techniques and selectively combined in the projects. For the student with a knowledge of fusing who is interested in exploring new techniques in the medium. |
||||||||||||
|
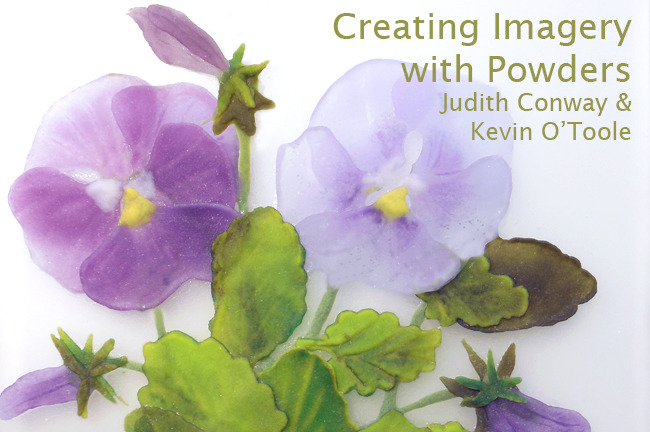
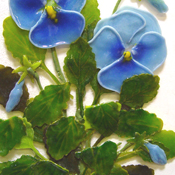
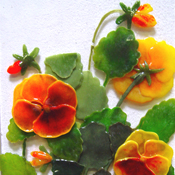
Understanding how to use glass powders effectively allows you to think about glass and glass design in a completely new way. You can break out of the limits of sheet glass as you become more painterly in your work, using soft lines and shading rather than the harder lines of cut glass pieces. You can mix and overlay powders to create new colors and subtle hues. We will demonstrate how to make powder wafers to create realistic details in your work and you will create both a floral study and a landscape as you explore these techniques. |
||||||||||||
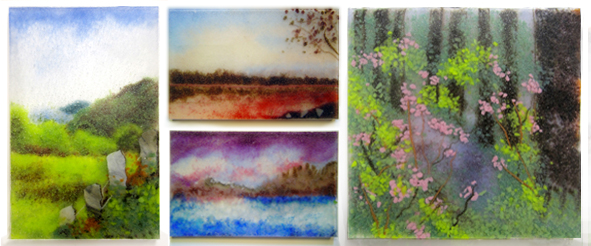
examples of student projects from recent classes |
||||||||||||
|
|
||||||||||||
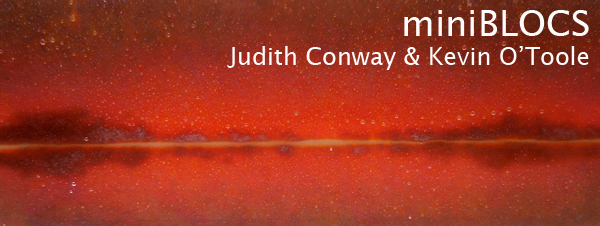
|
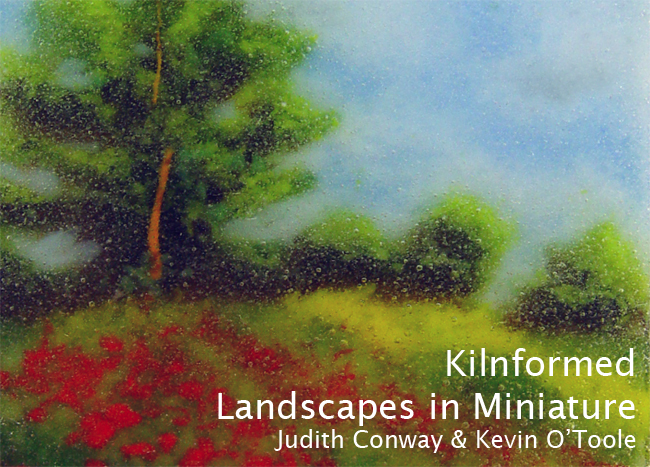
In this three-day class, the first in a series, we will attempt to capture the beauty of the landscape around us in diminutive kilnformed panels. The small size of our projects will ensure that students will have the opportunity to complete several pieces during the class.
We will demonstrate how to use glass frits and powders to create a variety of miniature landscapes in a Pate de Verre style. We’ve eliminated the complicated and messy mold making process typical of Pate de Verre, but have kept the subtlety of line and color that makes traditional Pate de Verre so appealing. This class will also emphasize attention to detail and the importance of good design and craftsmanship in the execution of the final projects. We will discuss and demonstrate various ways of displaying the final pieces. |
||||||||||||
Examples of student projects from recent classes. |
||||||||||||
|
|
||||||||||||
|
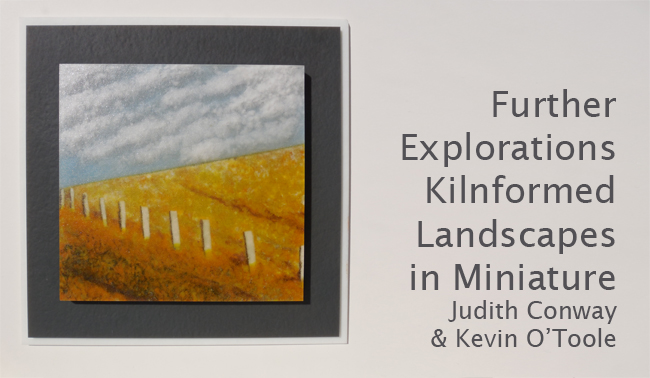
This three-day course is the second in a series of workshops focusing on the landscape in miniature and is designed for the student who has already taken our Kilnformed Landscapes in Miniature course as it builds on the concepts and techniques covered in that course.
Prefired components, larger formats, new color palettes, and multi-part pieces are just a few of the many new techniques we’ve discovered and the class will further explore these topics. This class will focus attention on the importance of good design paired with good craftsmanship in the execution of the final projects. We will also place emphasis on the importance of consideration of the method of display for each piece from the beginning. Prerequisite: Landscapes in Miniature |
||||||||||||
|
||||||||||||
|
In this three-day class, the third in the uniquely Vitrum Series of Miniature Landscapes, (are you seeing a pattern here.?!), students will experiment with and learn to create effective and display-ready miniature landscapes that can either be a free-standing thick block or a wall-hung panel. In the free-standing block project a thick clear glass block covers and enhances the delicate landscape composition it protects. After a little coldworking on its four sides, it goes back into the kiln for a special firing that creates the look of a hand-polished finish without all the labor. A second new approach creates a unique framed effect around a miniature image. The scene is enhanced when surrounded by the resulting “frosted” frame. And the piece is almost gallery-ready for hanging when it leaves the kiln after one firing. Through lecture, demonstration and samples, each student will be guided step-by-step through the basic processes. Students will then have ample time to design and create their own pieces, perhaps displaying environments that are special to them. Firing schedules and display options on the third day complete the class. |
||||||||||||
|
||||||||||||
|
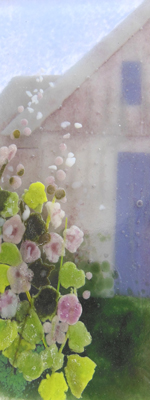
T Judith often teaches A Sense of Place when she teaches in Europe. Over the past few years the students have put their own unique stamp on the projects. Their influences as well as that of the local environs are the inspiration for this special class at Vitrum Studio. This three-day workshop will consist of a multi-faceted approach to kiln forming that is well suited to combining hard lines of architectural images with the soft flowing lines of the organic, natural world. You’ll design and construct two projects while experimenting with the technical aspects of designing with both sheet glass and glass frit in a single composition. This technique can be both rewarding and challenging. During the course you will be shown a variety of methods for creating imagery in glass and you will complete two pieces - one based perhaps on a neighbor’s view of an English cottage and garden, and one based on a closer view of a window, gate or doorway enhanced by the abundance of summer annuals and perennials. We will be using the full range of the Bullseye palette – frits, powders, stringers and sheet glass - to achieve the desired imagery. Returning students are welcome to attend and work on their own landscape designs. If you’ve enjoyed taking Sense of Place, then you’ll love this class. |
||||||||||||
|
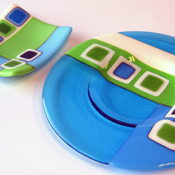
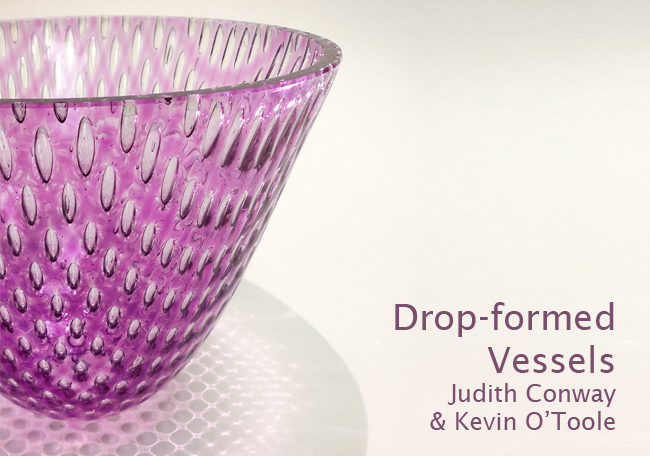
Dramatic Drop-formed Vessels
You will have the opportunity to design and fabricate two drop forms during class, one large and one small. We will discuss various mold options and will have a wide variety of finished bowls and vases to inspire you. We will also have several drop-formed vessels in various stages of the slumping process so that you can observe the actual movement of the glass during the firing. During the second day of class, you will coldwork and finish the slumped forms created on the first day. |
||||||||||||
 original class project by Trish Sitnik |
||||||||||||
|
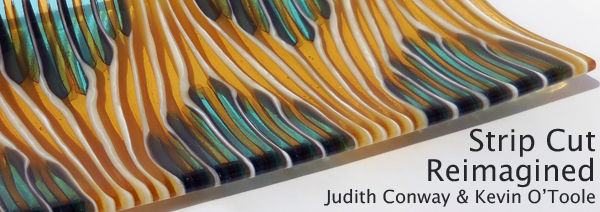
In this unique class we will reexamine this time-honored glass construction process pioneered by Klaus Moje, the father of contemporary kiln glass. Pushing the limits of what we know as strip cut construction, we will explore what happens when variables are altered. Choosing from Vitrum Studio’s extensive library of samples for this class, we will explore and research design possibilities through sample making. On the first day, each student will create a variety of samples. Then, as a group, the class will examine the results of each of those samples after firing. These carefully analyzed results will inform the design of the final larger project on the second day. |
||||||||||||
 |
||||||||||||
|
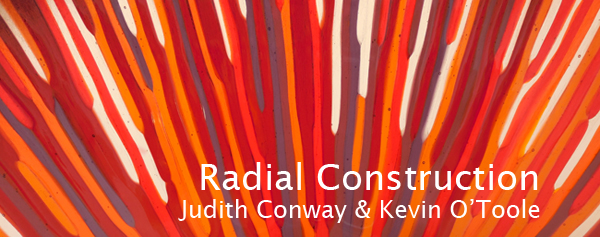
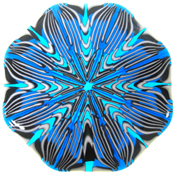
This is the second in a series of classes that reinterprets one of the basic construction techniques in the kiln former’s arsenal – strip set on edge, then dammed and fired. Radially arranging strips of glass is a versatile play on this time-honored way of working, and is suitable for creating designs that range from precise and formal to loose and organic. Using this method of construction, precisely symmetrical patterns reminiscent of the Art Deco period are just as achievable as naturalistic branching structures. Choosing from Vitrum Studio’s extensive library of samples for this class, we will explore and research design possibilities through sample making. On the first day, each student will create a variety of samples. Then, as a group, the class will examine the results of each sample after firing. These carefully analyzed results will inform the design of the final larger project on the second day. |
||||||||||||
|
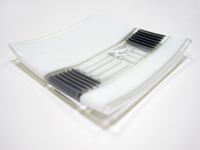
Strip cut construction is a process pioneered by Klaus Moje, and a technique frequently used by many contemporary kilnforming artists. In strip cut construction, sheet glass is precisely cut into narrow strips, which are then arranged on edge, contained by dams and fired, forming a solid glass piece that is generally bubble free. It is possible to achieve very precise graphic designs in strip-cut work by varying the colors and the arrangement of the strips. Intricate designs can be inserted in the strip construction, creating a piece with delightful ‘windows.’ This method is time-consuming and exact, but the results are well worth it. You’ll learn cutting methods and tricks, and make test panels and components for your designs on the first day and will complete a strip cut bowl on the second day. In the course of this workshop you will also learn to use the tile saw, flat lap grinder and sandblaster.
|
||||||||||||
examples of student projects from recent classes |
||||||||||||
|
New Traditions in Pattern Bars
This class is equally valuable to the kiln former completely new to the construction techniques of pattern bars, since basic techniques will be demonstrated and explored, and will also be of great interest to more experienced fusers who are seeking new ways of using pattern bars in their own work. |
||||||||||||
|
||||||||||||
|
Pushing the Pattern Bar: Advanced Techniques
Pattern bars have long been one of the basic techniques in kilnformed glass, and they still prove to be a great way to introduce visual texture and complex pattern into your kilnformed work. Several different techniques for constructing pattern bars will be demonstrated, and a variety of studio-exclusive pattern bar molds will be demonstrated. You will have the opportunity to create numerous projects of your own design over the course of the class. Good design, attention to detail, and quality craftsmanship will be emphasized. We will take advantage of the cold shop to give our pieces a finished, professional look, and will encourage you to make thoughtful projects that are carefully considered from beginning to end. |
||||||||||||
|
||||||||||||
 |
||||||||||||
|
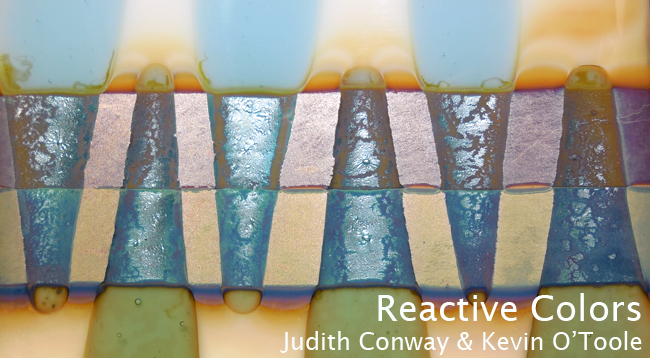
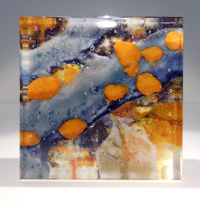
This is an intensive introduction to working with glass colors that chemically react with each other during the fusing or flame working process. Vitrum Studio’s staff members and many of its visiting instructors have long used these color reactions to great effect in their own personal work, and now we’ve brought together the information we have learned into a comprehensive course on this fascinating aspect of kilnforming. Students will begin by creating sample charts of the reactive glasses as a reference for their home studios. They will also create samples exploring the potential of these reactive glass combinations and finally will complete a larger kilnformed composition that incorporates color reactions as a part of the design. We will have access to Bullseye Glass’ large palette of reactive glass colors, stringers and rods (including the luster rods), silver foil, as well as their Reactive Cloud White and Reactive Clear Ice during the workshop. |
||||||||||||
|
||||||||||||
 |
||||||||||||
|
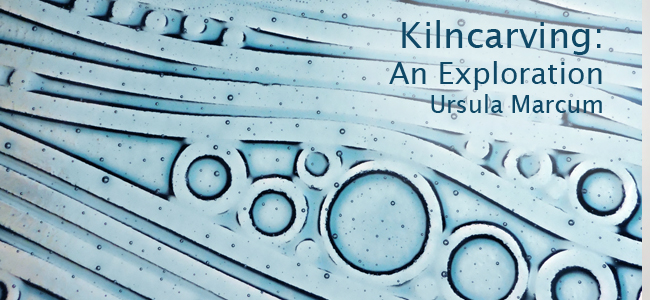
In this two-day class you’ll be introduced to the endless design possibilities when you “carve” shapes into the back surface of glass using a variety of fiber materials. These materials, in turn, lead to vastly different surface results. This is a wonderful method to create glass panels with incredibly detailed contours that catch, bend and reflect the light. It’s a simple technique that can produce a complex, sculptural look in your work.
We’ll introduce you to the technique with lectures and demonstrations, including information about which glass styles work best and the importance of correct firing temperatures. You’ll create a set of samples with multi-layered designs. After firing, we’ll discuss the results of each set of samples. With this new knowledge you’ll have the opportunity on the second day to design and create a large kiln carved panel (or two smaller panels). Tuition includes all glass and materials for the completion of the projects. Glass cutting skills are helpful but not necessary. |
||||||||||||
|
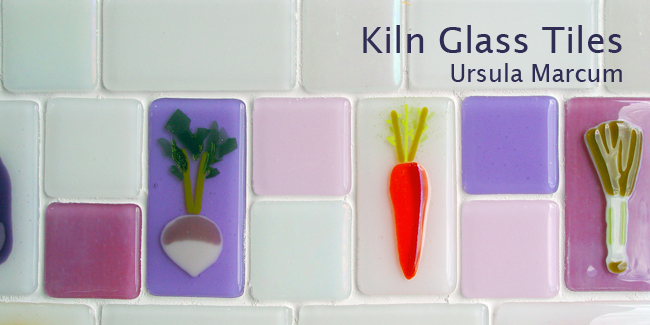
This two-day workshop is designed to introduce you to the techniques involved in creating one-of-a-kind accent tiles. You will explore various glass tile making techniques that are designed to give consistent results whether you are making one tile or a hundred. We will discuss methods of maintaining a consistent size and footprint in your tiles, and how to manage the contour of the design using heat control. Among the topics to be discussed and illustrated are:
|
||||||||||||
|
|
||||||||||||
|
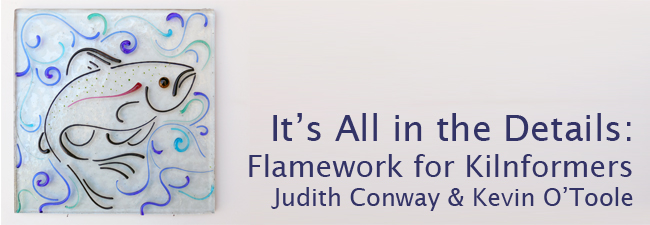
NEW version of a much-requested (and seldom-taught) workshop! Judy and Kevin have long incorporated torchworked elements in their kilnformed panels and sculptures, and there simply isn’t a better way to highlight the fluid nature of glass. In this workshop students will learn how to use the Minor bench burner (oxygen-propane torch) to create an exciting array of design elements for kilnforming applications, and how to use these elements in finished pieces. You will learn to make millefiori in a variety of ways – using optic molds, pre-fired bundles of glass and a simple method using encased rods and stringers. You’ll also learn several new ways of creating unique stringers and unusual twisties using the Minor torch and will have a wide assortment of Bullseye-compatible flameworked components to take home for future work. During this workshop you will also make a series of sample tiles exploring the techniques that have been demonstrated and design a final kilnformed composition incorporating torchworked elements that you have created. |
||||||||||||
|
||||||||||||
 |
||||||||||||
|
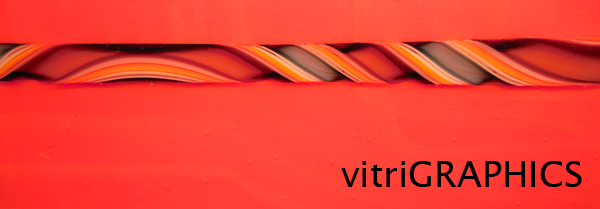
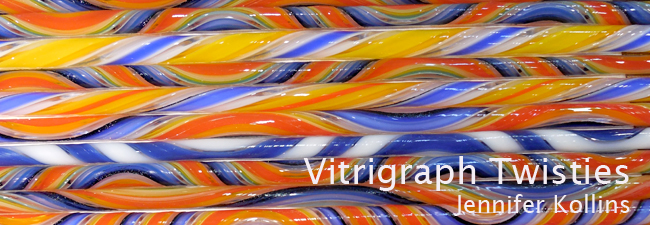
What fun! Here’s your chance to pull twisted cane at the Vitrigraph, make your own vitrigraph pot in the colors you like with a partner AND then make a final project with your cane creations, all in a two-day class! On the first day, you’ll explore various ways of pulling and twisting your canes for various effects, and each student will share the canes pulled from 5 different pots. Then we’ll demonstrate how to load your vitrigraph pot for the maximum color separation and contrast, and you and a partner will choose your favorite colors from those available and actually design your own pot. The next morning you will pull the twisted canes from your vitrigraph, giving you a wide variety of canes to choose from to use for your final project and the extra twisties are yours to take home and use in other projects! |
||||||||||||
 |
||||||||||||
|
Here's your chance to try your hand at pulling twisted canes (Twisties) at the Vitrigraph! We'll go over basic safety issues and appropriate safety glasses and gloves. You'll then have all the fun of pulling your own custom-made Twisties to use in future kiln glass work. You can select your pot from an assortment of Vitrum-selected color combinations that we will send out before class. When you arrive for the session, you'll work at your own Vitrigraph kiln with a filled and pre-heated pot. You'll have control over the designs you make, and you can experiment with various ways to twist the cane for different results. There will be five different pots (one pot per kiln) going that day and each pot should make well over 40 feet of Twisties alone - so you may want to trade your canes with your neighbors - it's up to you! With a full pot to work with, you can expect about 1.5 hours of active cane pulling, so consider bringing a friend to share the cost and split the labor. (For safety reasons, no more than two people will be allowed at each pot.) Beginner level. |
||||||||||||
|
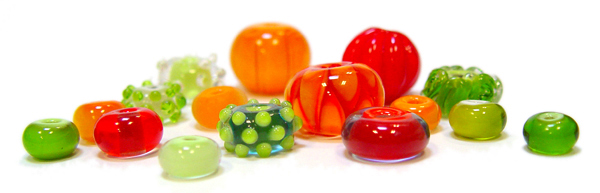
Introduction to Glass Bead Making
A Basic Bead Making Kit will be available for a special price of $150. It contains everything you need to continue to make glass beads at home, including 10 glass rods of your choice. |
||||||||||||
 |
||||||||||||
|
Mapping the Surface:
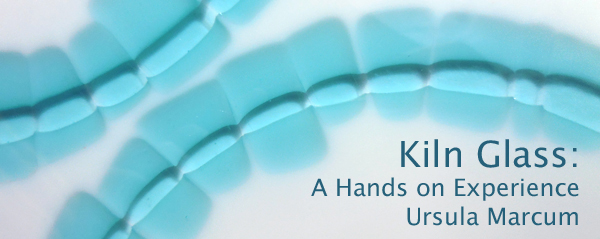
In this two-day workshop, we will explore various surface treatments and cold working techniques that can elevate the ordinary glass object to the extraordinary. We’ll teach you how to improve your cold working skills and learn to successfully use the glass lathe, diamond lap wheel, wet belt sander, diamond saw and sandblaster. Each student will have an opportunity to use every tool demonstrated in class to create a complex sampler of surface treatments. Students will also take an ordinary clear kilnformed glass bowl and transform it into an elegant cold worked object. Note: You must complete this course before you can rent time on our diamond lap wheels or glass engraving equipment. |
||||||||||||
 |
||||||||||||
|
This two-day introductory workshop is designed with the beginner in mind and will guide you through an exploration of the possibilities of fused and slumped glass. We will demonstrate the basics of glass cutting, demystify the kiln and its controller, explain the various steps of a firing schedule and discuss the importance of glass compatibility and annealing. You will be able to experiment with design possibilities using a wide variety of frit, stringers, confetti, sheet glass and iridized glass in the Bullseye Glass palette. During the class you will create a set of example tiles, a thick color study tile and two fused and slumped bowls. Our goal is to introduce you to both the technical and artistic side of the medium of kilnformed glass. Tuition includes all materials and the use of basic tools, and is a prerequisite for most of our other classes. |
||||||||||||
|
|
||||||||||||
|
This two-day introductory workshop is designed with the beginner in mind and will guide you through an exploration of the possibilities of fused and slumped glass. We will demonstrate the basics of glass cutting, explain the various steps of a firing schedule and discuss the importance of glass compatibility and annealing. You will be able to experiment with design possibilities using a wide variety of frit, stringers, confetti, sheet glass and iridized glass in the Bullseye Glass palette.
During the class you will create a set of example tiles, a thick color study tile and two fused and slumped bowls. Our goal is to introduce you to both the technical and artistic side of the medium of kilnformed glass. Tuition includes all materials and the use of basic tools, and is a prerequisite for most of our other classes. |
||||||||||||
|
||||||||||||
|
|
||||||||||||
|
Kilnformed Glass II is the ideal next step for the student who has completed Introduction to Kilnformed Glass, either at Vitrum Studio or at another studio. It is also beneficial for those who jumped head-first into creating with glass on their own and now have questions about the process. This two-day workshop will strengthen your knowledge about the technical aspects of fusing glass, freeing you to express yourself artistically. You will be introduced to basic design concepts by designing and creating a plate and two coordinating pieces of tableware (you’ll have several styles and shapes from which to choose). We will show you ways to refine your glass cutting skills and you will gain a better understanding of common problems you may encounter - and how to avoid them. You’ll learn to use a circle cutter, how to cut glass to fit other shapes, and how to measure and cut glass to fit other pieces in a composition. Simple methods for coldworking an edge will be explored so that you can create more professional work even in a small home studio. Finally, a refresher on firing schedules and proper firing techniques will be reviewed so that you will be prepared to work on your own and adapt firing schedules appropriately for your own projects. |
||||||||||||
examples of student projects from recent classes |
||||||||||||
 |
||||||||||||
|
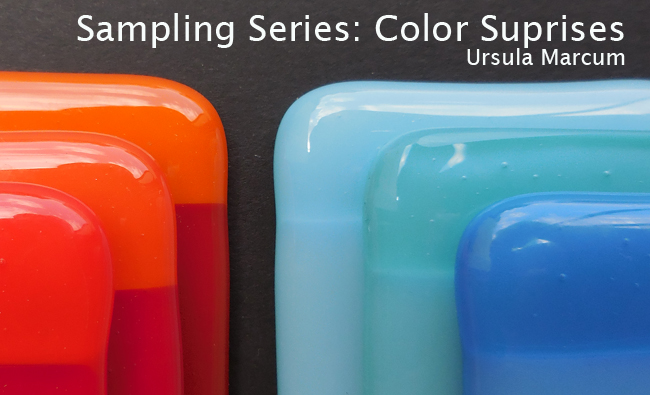
This one-day workshop offers students the opportunity for the focused study of kilnformed glass through sample making. In the “Color Surprises” workshop, the class will discuss and experiment with some specific hues that yield unexpected results when fired. An extensive collection of glass samples will be on hand to enhance discussion and inspire your color choices. Students will have access to the full Bullseye sheet glass palette for the creation of their own unique sample set. The usefulness of sample making and best practices, along with storage solutions, will be covered. Both experienced kilnformers and those new to the art form will benefit. |
||||||||||||
 |
||||||||||||
|
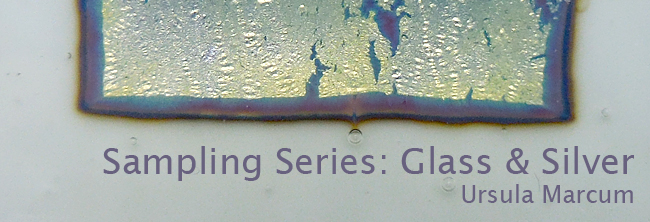
In the “Glass and Silver” workshop, the class will discuss and experiment with combinations of Bullseye Glass and silver foil and the magical reactions that occur when these two are fused together. Students will have access to the full Bullseye sheet glass palette that reacts with silver as we examine and discuss the way the silver reacts with the base glass, and how combining the two and selectively covering part of the silver creates a whole new color surprise! The usefulness of sample making and best practices, along with storage solutions, will be covered, and each student will make 16 silver and glass reactions samples during the class. Both experienced kiln formers and those new to the art form will benefit. |
||||||||||||
 |
||||||||||||
|
LOOKS simple – BUT to make it look GOOD you need to know the tricks!
Try your hand at designing and creating a functional kiln formed platter in this NEW one-day class in our popular Sampling Series.
You’ll create a plate of your own design using opal and transparent colors in a bold Vitrum-designed color scheme. By carefully stacking and overlapping these color layers, you’ll make more colors in the same sophisticated palette while creating a complex design. We’ll fire the piece for you after class and shape it in a mold. You’ll have a beautiful and unique piece that can grace your home or make some lucky person happy. Tuition of $150 includes all material, firings and use of all needed tools for a finished glass piece. |
||||||||||||
 |
||||||||||||
|
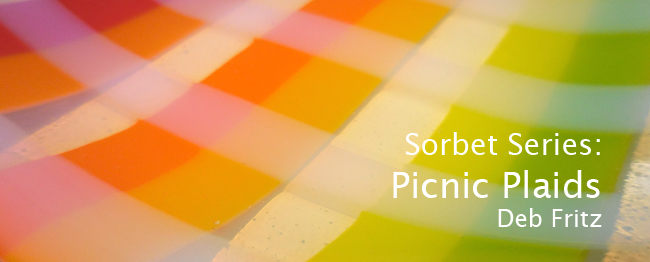
Another NEW class! Using the same summer palette as we use in the Polka Dot pieces, these Picnic Plaid dishes add a new twist.You’ll use overlapping strips of glass in the same color palette of sorbet, gelato and creamsicle to create both new colors and a fanciful plaid design. This set includes three square dishes (or a tray and two smaller dishes) absolutely perfect for serving summer cakes, fruits and berries. Tuition of $155 includes all materials, firings and use of all needed tools for three finished glass pieces. |
||||||||||||
 |
||||||||||||
|
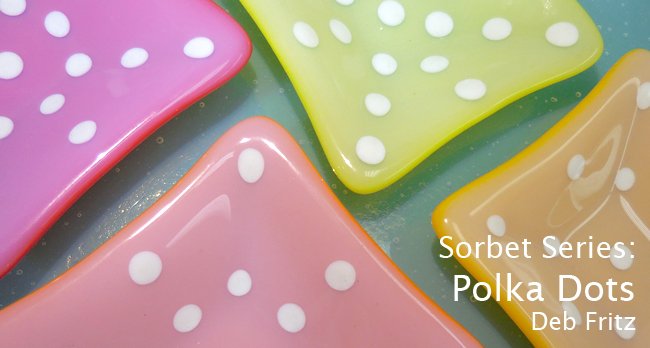
We've developed a NEW, one-day workshop in our Sampling Series in anticipation of warm sunny days ahead! This fun, brightly-colored summer set includes a platter and two smaller dishes in a fabulous color palette of sorbet, gelato and creamsicle developed here at Vitrum. We'll show you the easy way to use polka dots in a pattern of your choice to decorate the two smaller dishes that rest on the demure rectangular platter, or go wild and put polka dots on all three pieces! Tuition of $155 includes all materials, firings, coldworking of the edges and use of all needed tools for three finished glass pieces. |
||||||||||||
 |
||||||||||||
|
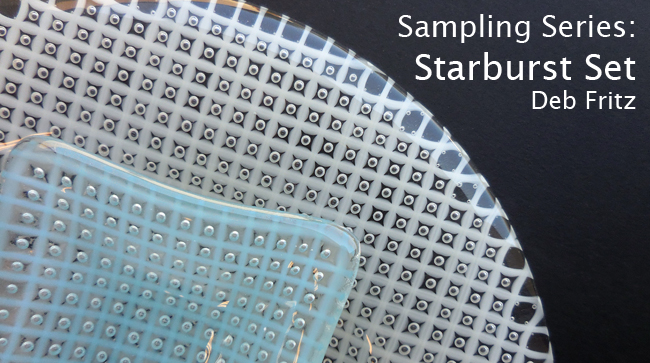
Learn some of the easy ways you can intentionally trap bubbles in your kilnformed glass – bubbles that make intense starbursts of light- while you create a two piece serving set. We’ll go over the basic methods commonly used to trap air between layers of glass, and then you’ll create two pieces – a plate and a coordinating square dish using a specially chosen palette. We’ll show you techniques for accurate placement of the elements to trap theses little spheres of light, and you’ll be on your way! We‘ll fire the projects after class, and then slump them into the appropriate molds. Tuition of $155 includes all materials, firings and use of all needed tools. |
||||||||||||
 |
||||||||||||
|
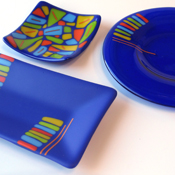
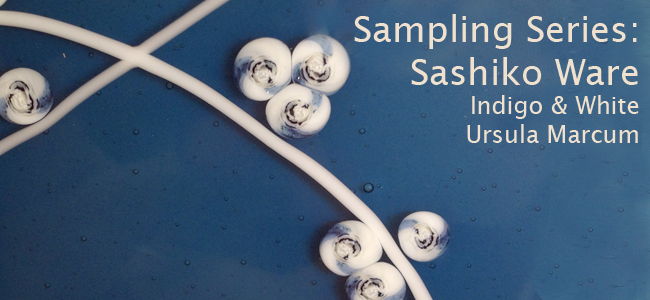
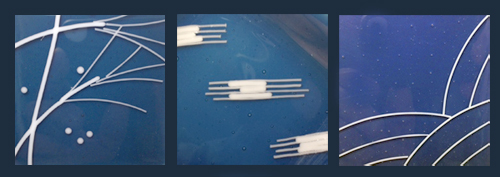
We've developed a new, one-day workshop in our Sampling Series in celebration of the Cherry Blossom season: Sashiko ware: Indigo and White.
We've got numerous tips and tricks to share as you make this set of Asian-inspired dishes in the traditional indigo and cream colors to grace your home or to give as a gift that will be treasured for seasons to come. We'll approach the projects using basic design principles, and give you guidance on the best use of stringers, rods (and even some elements you'll create yourself) to make elegant, unusual designs inspired by traditional Asian patterns. We'll cover the firing schedules and supply all the materials for a small platter and two coordinating dishes. We hope you can join us for the fun! Tuition includes all materials and the use of needed tools. |
||||||||||||
 |
||||||||||||
 |
||||||||||||
|
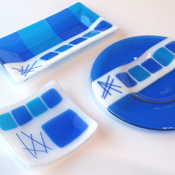
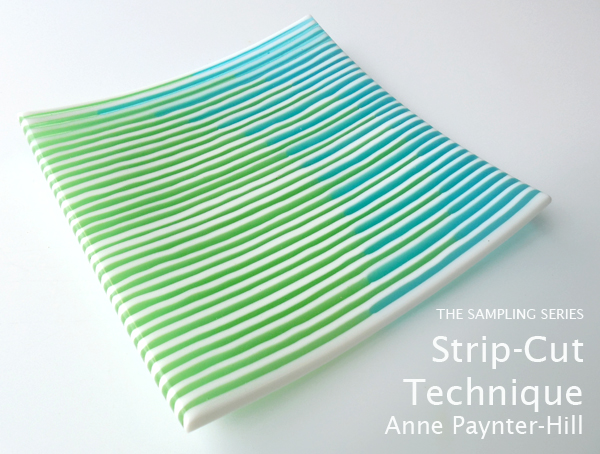
Join us for this fantastic class and take home a strip-cut 8” x 8” plate that you designed! This is a wonderful opportunity to sample the strip-cutting process while you make a finished piece for yourself or for a special gift.
We’ll have pre-cut strips in a subtle palette of 9 gorgeous tints, White, French Vanilla and Clear Bullseye glass. You’ll create your design (geometric or random lengths) under the instructor’s guidance, learn to dam it properly, then we will fire it and cold work the edges for a professional finish, and slump it into a mold. Tuition of $175 includes all material, firings, coldworking of the edges and use of all needed tools for a finished glass piece. |
||||||||||||
 |
||||||||||||
|
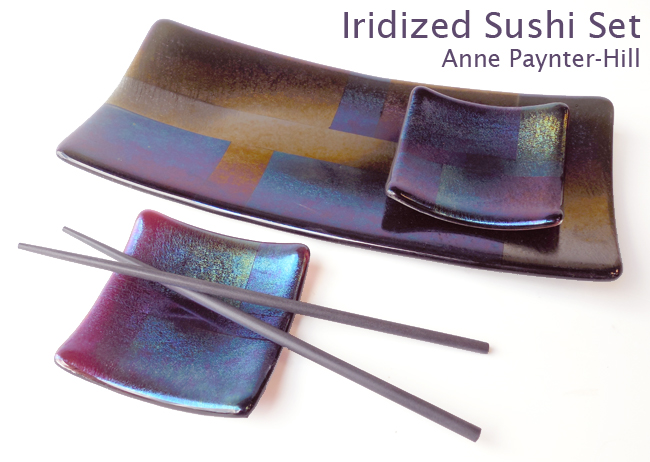
This elegant sushi trio would be a great addition to your tableware, or would make a perfect gift that they’ll actually use! You’ll work with iridized glass to design and make an Asian-inspired sushi tray and two smaller sauce dishes using different parts of the colorful iridized coating to emphasize your design. We’ll first cover the basics of working with iridized glass, then show you some tips on designing for the three pieces so that they match or coordinate. We’ll show you ways to get the look you want through careful cutting and piecing (you’ll have an opportunity to try out the Portable Strip Cutter). Then you’ll design and make your own set of dishes. We’ll go over all the firing schedules and supply all the materials for all three pieces in this one-day course. We hope you can join us! Tuition includes all materials and the use of needed tools. Beginner level. |
||||||||||||
 |
||||||||||||
|
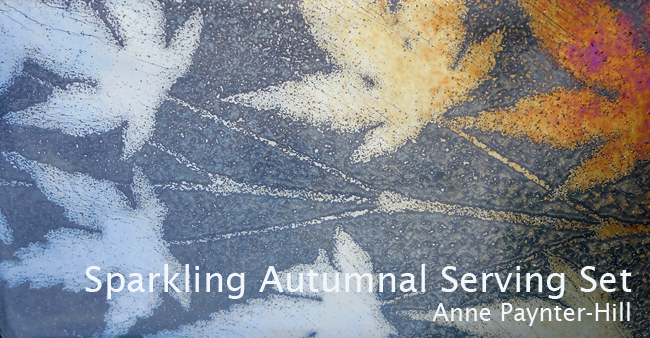
This beautiful trio will be a unique set for your fall table, or a perfect present for anyone on your gift list. Using transparent or opal glass in an autumnal palette, you’ll make an unusual nature-inspired tray and two smaller coordinating dishes with a sparkling, subtle design. Starting with basic design principles, we’ll give you guidance and design tricks to capture a soft leaf pattern on the surface of the dishes. Then, we’ll help you create a composition that will enhance the design on the top. We will have numerous samples to inspire you to make a set that is coordinated or works as individual pieces. In this one-day course, we’ll cover the basics of working with iridized glass, then go over some cutting tips (and you’ll get to try out the Portable Strip Cutter!), then you’ll design and compose your set. Finally, we’ll review the firing schedules. Tuition includes all materials and the use of needed tools. Beginner level. |
||||||||||||
 |
||||||||||||
|
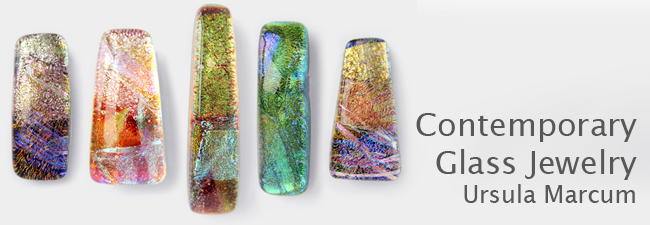
Working in a professional glass studio, you will create fused pendants, earrings, and pins in this introductory workshop while learning to exploit the transparency, depth, and unique sparkle of glass.
You will be introduced to the techniques of layering colored glass, using dichroic coatings, shaping blanks with saws and grinders, and using multiple firings to create a professional look on the finished pieces. On the second day you will also be introduced to basic wire wrapping and jewelry construction techniques. Discussions will include setting up a basic home studio for small scale jewelry fusing and coldworking. Tuition includes all materials and the use of basic tools for a variety of jewelry pieces. |
||||||||||||
 |
||||||||||||
|
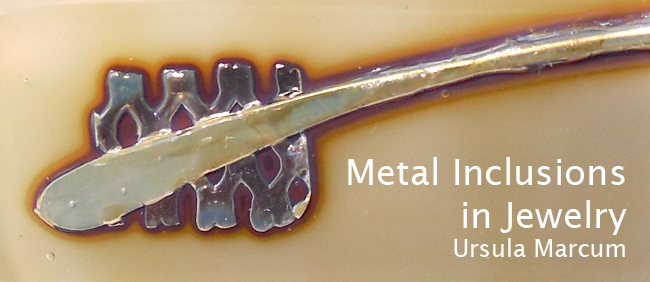
Are you looking for a way to make your jewelry stand out from the crowd? We will show you techniques to create unique kilnformed glass pendants, earrings and pins incorporating a variety of both fine and base metals. We will use silver, copper and gold in several forms – leaf, foil, mesh and wire - in a wide range of new and interesting techniques. We will demonstrate methods of designing with these metals to cause reactions in the glass, and how to incorporate hammered metals and clear frits into your jewelry. Simple coldworking methods for jewelry will be covered, as well as fire-polishing techniques for a professional look. Basic glass jewelry experience is preferred. Tuition includes all materials and the use of needed tools. Intermediate level. |
||||||||||||
|
© Copyright 2022 Vitrum Studio
All graphics, original artwork, site design and textual material on this website (vitrumstudio.com) is protected by United States copyright law and international treaties. You may not copy, distribute, sell, redesign, take credit for or use any material owned by Vitrum Studio, Judith Finn Conway, and/or Kevin O'Toole.
No part of the contents of this site may be reproduced without the written permission of the Owners of Vitrum Studio, Judith Finn Conway, and/or Kevin O'Toole. Please contact us at vitrum@vitrumstudio.com to use or copy graphics, original artwork, site design and textual material on this website |
||||||||||||

 he English Cottage Garden in Glass Hard Lines/Soft Lines
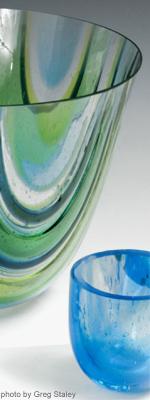
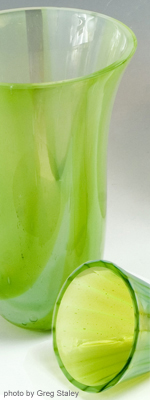 Drop-formed vessels are made by slumping a piece of glass through a ring-shaped mold that is suspended in a kiln. This technique allows for the creation of deep bowls and vases with a decidedly soft and fluid form, characteristics more akin to blown glass than to kilnformed glass.
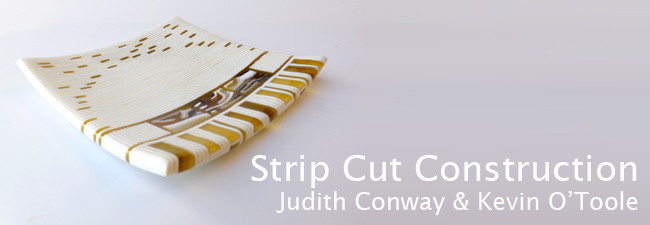
 Pattern bars are thick fused slabs, generally built out of multiple layers of colored sheet glass. These bars are most often cut into thin cross sections, exposing repeating patterns that can be used as design elements in fused glass panels and bowls. We will use several traditional methods to construct basic pattern bars, and then these bars will be the raw material for the primary focus of the class: exploring new and intriguing ways of using them. The bars will be sliced, diced, cubed and arranged in non-traditional ways that exploit glass’s ability to flow.


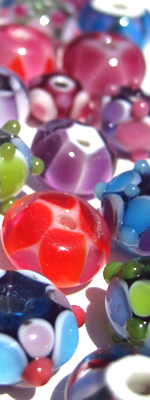 Explore the ancient art of making glass beads at a torch. Using the Hot Head® torch and Bullseye compatible glass rods, you will learn to make basic glass beads, and then progress to making various shapes - square beads, fish beads, dotted beads, etc. We will cover all the fundamental techniques for creating successful glass beads at a torch, including studio set-up, and safety considerations. All materials needed for the class will be provided.